Every home needs a solid frame overhead. That frame comes from careful roof truss design. Builders rely on it to hold up shingles, snow, wind loads, and everything the sky throws at a structure. Get it wrong, and you risk sagging ridgelines or worse. Get it right, and your roof lasts for decades.
This guide breaks down everything you need to know. We cover the basic parts, the common types, the load factors, the materials, and the mistakes that trip up first-time builders. Whether you’re planning a garage, a custom home, or a commercial warehouse, good roof truss design sits at the center of the project.
What Is Roof Truss Design?
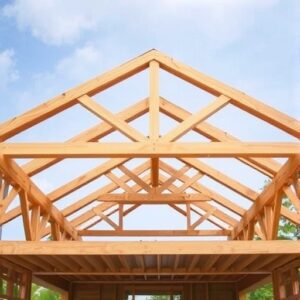
Roof truss design is the process of engineering a triangular framework that supports a roof. Engineers pick member sizes, connection points, and angles based on the loads the roof must carry. The triangle shape matters here. A triangle holds its form under pressure. You can’t twist it out of shape without breaking a side. That rigidity makes triangles the backbone of nearly every truss on the market.
A finished truss usually rests on exterior walls and spans the full width of a building. This approach frees up interior space. Builders no longer need load-bearing walls in the middle of a room. That’s a major reason roof truss design replaced traditional stick-framed rafters in most modern construction.
The Basic Parts of a Truss
Before you dive into truss types, you need to understand the pieces. Good roof truss design always starts with these three components.
- Top chords form the sloped outer edges of the truss. They follow the roofline and carry compression loads from snow, wind, and roofing material pressing down from above.
- Bottom chords run horizontally and tie the two ends of the truss together. They resist the outward push created by the top chords. Most ceiling finishes attach directly to the bottom chord.
- Web members connect the top and bottom chords. They transfer load between the chords and keep the whole shape rigid. Depending on the truss style, webs may run diagonally, vertically, or in a repeating pattern.
Metal connector plates join these pieces in most wood trusses today. These plates bite into the wood fibers and spread load evenly across the joint. Good roof truss design depends heavily on these connections holding tight under stress.
Why Roof Truss Design Matters So Much
A poorly planned truss can fail under snow load, sag over time, or transfer too much stress to the walls below. Sound roof truss design prevents all three problems. It balances strength against weight, and cost against performance.
Builders also lean on trusses because factories build them off-site. A shop cuts and assembles each truss with jigs and presses, so quality stays consistent. Site crews then lift finished trusses into place. This approach speeds up construction. Some contractors report installation times up to 50% faster than stick framing, since roof truss design shifts the labor-heavy work into a controlled shop environment.
Beyond speed, smart roof truss design also protects your wallet. Trusses use less lumber than traditional rafter framing because engineers calculate exact loads instead of over-building for safety margins. Less material means lower material costs, especially on larger projects.
Common Types of Roof Trusses
Not every truss suits every building. Roof truss design changes based on span, roof shape, and intended use. Here are the styles you’ll run into most often.
King Post Truss
This is the simplest style in roof truss design. It uses five members total: two sloped top chords, one horizontal bottom chord, and two diagonal webs that meet at a single central post. The king post hangs in tension and keeps the top chords from sagging at the peak.
King post trusses work best for short spans, generally between 16 and 26 feet. Sheds, small garages, and covered porches use this style often. It’s cheap, simple, and easy to fabricate.
Queen Post Truss
A queen post truss adds a second vertical post, creating an open space in the middle. This gap allows for a small loft or extra headroom. Builders choose this style in roof truss design when they need slightly longer spans than a king post can handle, usually up to 30 feet.
Fink Truss (W Truss)
The Fink truss is the most common style in residential roof truss design across the country. Its web members form a “W” shape between the chords. This pattern spreads load efficiently and keeps material costs low.
Fink trusses handle spans from 20 to 60 feet, which covers most homes built today. Because the shape uses less lumber per foot of span, contractors default to Fink trusses unless a project calls for something specific.
Howe Truss
A Howe truss uses diagonal web members that slope toward the center, with vertical members added for extra support on longer spans. This layout puts the diagonal members in compression and the verticals in tension.
Howe trusses show up in longer commercial spans and in older bridge and barn construction. Engineers still specify this style in roof truss design when a build needs extra strength across a wide open area.
Pratt Truss
The Pratt truss flips the diagonal direction compared to a Howe truss. Diagonals slope away from the center and carry tension, while verticals carry compression. This setup uses material efficiently on medium to long spans.
You’ll find Pratt trusses in industrial buildings and larger agricultural structures. Roof truss design teams often choose this style when steel members join the mix, since steel handles tension loads very well.
Scissor Truss
A scissor truss crosses its bottom chords instead of running them flat. This creates a vaulted or cathedral ceiling look inside the building. Homeowners who want an open, airy feel inside often request this style.
Scissor trusses need more engineering attention than a flat-chord design. The crossed chords change how load moves through the structure, so roof truss design for this style usually costs more per truss than a standard Fink.
Attic Truss
An attic truss leaves open space in the lower-middle section of the frame, big enough for a room, storage, or a small office. Roof truss design for attic trusses accounts for floor loads in addition to roof loads, since people will walk and store items inside that open cavity.
This style costs more than a basic truss, but it adds usable square footage without expanding the building’s footprint. Many homeowners find that tradeoff worth the extra cost.
Hip Truss
A hip roof slopes on all four sides instead of just two. Roof truss design for a hip roof involves several truss shapes working together, including common trusses down the center and jack trusses along the hipped ends. This style handles wind loads well, which makes it popular in coastal and hurricane-prone regions.
Gable Truss
A gable truss sits at the end wall of a building and forms the classic triangular peak you see on most houses. Unlike structural trusses inside the roof, a gable truss mainly encloses the end wall and doesn’t carry much roof load itself. Roof truss design still requires bracing gable trusses properly, since wind pressure hits this flat wall directly.
Mono Truss
A mono truss has just one sloped top chord instead of two, creating a shed-style single-slope roof. Builders use this style for lean-tos, additions, and modern single-slope home designs. Roof truss design for mono trusses focuses heavily on the high side wall, which must carry more vertical load than the low side.
Raised Heel Truss
A raised heel truss extends the depth of the truss at the outer walls, leaving room for full-depth insulation above the exterior wall line. Standard trusses taper to almost nothing at the eave, which limits insulation thickness right where heat escapes fastest.
Energy-focused roof truss design increasingly specifies raised heel trusses. Some studies report annual energy savings of 4 to 6 percent from this small design change alone, since it closes a common thermal gap.
Factors That Shape Roof Truss Design
Engineers don’t pick a truss style at random. Several factors drive every decision in roof truss design.
- Span: The distance between supporting walls determines how deep and how strong a truss needs to be. Longer spans need deeper trusses, more web members, or stronger materials.
- Roof pitch: Steeper roofs shed snow and rain faster but create taller trusses and more material use. Flatter roofs save material but need careful attention to drainage and load capacity.
- Snow load: Regional snow load data drives much of the structural math behind roof truss design. Northern climates need trusses built for heavier accumulated loads than southern regions ever see.
- Wind load: Hurricane and tornado-prone regions require reinforced connections and often hip-style roofs, since hips handle wind pressure better than gables. Roof truss design in these areas leans on stronger metal connectors and closer truss spacing.
- Seismic activity: Earthquake-prone regions add another layer of requirements. Some states, like California, mandate specific seismic design categories that shape truss spacing, bracing, and connection hardware.
- Building use: A garage doesn’t need the same truss as a warehouse. Roof truss design scales up in strength and complexity as buildings grow larger or carry heavier equipment loads, like HVAC units mounted on the roof.
- Truss spacing: Most residential trusses sit 24 inches apart on center, though some designs allow wider spacing with heavier members. Spacing affects material costs and the overall weight the walls below must carry.
Materials Used in Roof Truss Design
Wood remains the dominant material in residential roof truss design. Southern yellow pine and Douglas fir show up most often because both species offer strong, predictable structural properties at a reasonable price. Metal connector plates join the wood members and distribute load across each joint.
Steel trusses appear more often in commercial and industrial roof truss design. Steel handles long spans and heavy point loads better than wood, though it costs more upfront and requires specialized fabrication.
Cold-formed steel trusses have also grown popular for projects that demand fire resistance or extremely long spans. This material resists warping and pest damage, two problems that plague wood trusses in humid climates.
Some large commercial projects mix both materials, using steel for primary structural trusses and wood for smaller secondary framing. Roof truss design teams choose material based on span, budget, fire code, and local availability.
The Roof Truss Design Process
A typical roof truss design project moves through several stages before a single truss gets built.
- First, an engineer or truss designer gathers building specs. This includes the roof pitch, the span, the building’s location, and local code requirements for snow, wind, and seismic loads.
- Second, the designer runs load calculations. Software models how weight moves through each chord and web member under worst-case conditions. This step confirms that every piece of lumber or steel can handle its assigned load without failing.
- Third, the design gets stamped by a licensed engineer in most jurisdictions. This stamp confirms the roof truss design meets local building codes and can legally move forward to fabrication.
- Fourth, a truss plant builds each unit using the engineered specifications. Automated saws cut lumber to exact lengths, and hydraulic presses drive metal connector plates into every joint.
Finally, crews deliver and install the finished trusses on site. A crane usually lifts each truss into place, and workers brace it temporarily until the full roof structure ties together. Only then does roof truss design translate into an actual finished roof.
Common Mistakes in Roof Truss Design
Even experienced builders run into avoidable problems. Poor roof truss design often traces back to a handful of recurring mistakes.
Skipping local code checks causes major headaches. Every region sets its own snow, wind, and seismic requirements, and a generic truss plan won’t always meet them.
Ignoring point loads is another common error. HVAC units, solar panels, and skylights all add weight in specific spots. Roof truss design must account for these extra loads during planning, not after installation.
Under-bracing gable ends leads to wall failures during high wind events. Gable trusses need proper lateral bracing, even though they don’t carry much vertical roof load themselves.
Choosing the wrong spacing can also create problems. Wider spacing might look cheaper on paper, but it often demands heavier, more expensive individual trusses to compensate. Good roof truss design balances spacing against total material cost rather than optimizing one factor alone.
Finally, some builders skip a professional stamp on smaller projects to save money. This shortcut can void insurance coverage and create legal liability if the roof ever fails. A licensed engineer’s review protects everyone involved in the project.
Cost Considerations
Cost varies widely across different styles of roof truss design. A basic king post truss for a small shed costs far less than an engineered scissor truss for a vaulted living room. Material choice also swings the price significantly, since steel trusses typically cost more than comparable wood designs.
Span length drives cost too. Longer spans need deeper trusses with more material, which raises the price per unit. Roof truss design for a 60-foot commercial span will always cost more than a 24-foot residential span, even using the same style.
Labor savings often offset some of this material cost. Because factories build trusses off-site, installation takes less time than traditional framing. Fewer days on site means lower labor costs overall, which can balance out a higher material price tag.
Homeowners and contractors should always request multiple quotes before committing. Roof truss design costs shift based on regional lumber prices, local labor rates, and the complexity of the specific roof shape chosen.
Building Codes and Standards
Local and national codes shape nearly every decision in roof truss design. In the United States, the International Residential Code and International Building Code set baseline structural requirements that most states adopt with local amendments.
Seismic zones add extra layers of requirements. California, for example, requires trusses engineered for specific seismic design categories, along with energy code compliance under Title 24. Builders working across state lines need to check local amendments carefully, since roof truss design rules can change significantly from one jurisdiction to the next.
Wind zones near coastlines also carry stricter hardware and bracing requirements. Hurricane straps, reinforced connector plates, and closer truss spacing all show up more often in these areas. A truss plant familiar with local code will build these requirements directly into the roof truss design from the start.
How to Choose the Right Truss for Your Project
Picking the right style comes down to matching your goals against structural needs. Start with your desired ceiling shape. A flat ceiling works fine with a standard Fink truss, while a vaulted look demands a scissor truss.
Next, think about usable space. If you want a finished attic room, plan for an attic truss from the start. Retrofitting a standard truss later costs far more than specifying the right roof truss design during initial construction.
Consider your climate too. Snow-heavy regions need steeper pitches and stronger chords. Wind-prone coastal areas benefit from hip roofs and reinforced connections. Energy-conscious builders should ask about raised heel trusses to improve insulation at the eaves.
Finally, always consult a structural engineer or a reputable truss manufacturer before finalizing plans. Roof truss design isn’t a place to guess. A qualified professional will run the numbers and confirm your chosen style meets both your goals and your local code.
Maintaining Your Roof Truss System
Good roof truss design doesn’t end at installation. Regular inspections catch small problems before they grow into expensive repairs. Check the attic space at least once a year for signs of sagging, cracked members, or loose connector plates.
Watch for moisture too. Wood trusses can rot if roof leaks go unnoticed for long periods. Steel trusses resist rot but can corrode in humid or coastal environments without proper coating. Either material benefits from good attic ventilation, which keeps moisture levels low year-round.
Never cut or modify a truss member without consulting an engineer first. Even a small notch can compromise the entire load path that roof truss design carefully calculated. If you need to run wiring or ductwork through a truss, always route it through pre-approved openings or holes specified by the original design.
Frequently Asked Questions
How long do roof trusses last? Properly built and maintained trusses can last as long as the building itself, often 50 years or more. Roof truss design accounts for long-term load cycles, so failures usually trace back to water damage or unauthorized modifications rather than normal aging.
Can I modify a truss after installation? Only with engineering approval. Cutting or removing a member changes the load path the original roof truss design relied on, and this can weaken the entire roof structure.
Are wood trusses stronger than steel? Not generally. Steel handles longer spans and heavier point loads better than wood. However, wood remains cost-effective and performs well for most residential roof truss design needs.
How much does a typical truss cost? Prices vary by span, style, and material, but most standard residential trusses cost between $75 and $200 each. Custom shapes like scissor or attic trusses in more complex roof truss design projects cost noticeably more.
Do I need an engineer for a small shed roof? Many jurisdictions exempt very small structures from engineering review, but it’s worth checking local code first. Even simple roof truss design benefits from a quick professional review on anything larger than a basic garden shed.
Final Thoughts
Roof truss design shapes the strength, cost, and layout of nearly every building you’ll ever step inside. From a simple king post over a garden shed to a wide-span steel system over a warehouse, the right truss balances load, material, and budget.
Take time to understand your span, your climate, and your local codes before choosing a style. Talk to a licensed engineer or an experienced truss manufacturer early in the planning process. Smart roof truss design upfront saves money, prevents structural problems, and gives your building a roof that holds strong for decades to come.