Real Estate Photography: The Complete Guide
Introduction
Photography is essential to sell or rent real estate. More than 90% of prospects these days commence their home searches online. So, any photo must create that first impression. Great real estate photography sets listings apart so that they can attract more views and sell faster. This guide contains everything you need to know about starting from equipment, editing, to marketing your own services.

Why Real Estate Photography Matters
First Impressions Matter
Potential buyers will often choose to see a listing according to the listing photos. If the photos were dull, blurry, and horridly angled, then people might choose to pass the listing.
Trust and Professionalism
Or being professional is also taken to mean that the seller or agent is genuine. They establish trust. Such quality images showcase the property in the best light, both literally and figuratively.
Higher Selling Price
Redfin states that, in the opinion of realtors and sellers, if sellers decide to involve professional photography, their properties will tend to go into contract faster, sometimes also for much more money. A wonderful set of images tends to bring in more views and offers.
Essential Gear for Real Estate Photography
Camera
Any DSLR or mirrorless camera will work with just manual settings. A full-frame camera would be ideal in this case, but any crop sensor can be the right tool.
Wide-Angle Lens
Wide-angle lenses (14-24 mm for full frame or 10-18 mm for crop sensor) help in taking pictures of the full room.
Tripod
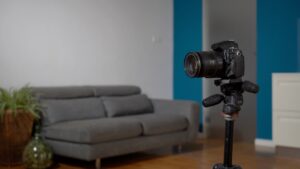
If you want the lines to remain straight, the tripod is most helpful to keep something in position. Tripods should always be used for interiors.
Flash and Lighting Equipment
Use flashes or strobes to brighten dark areas. A flash diffuser helps soften light.
Remote Shutter or Timer
Avoid camera shake by using a remote shutter release or the built-in timer.
Preparing the Property
Clean and Declutter
Ensure the property is clean. Remove clutter, personal photos, laundry, and trash bins.
Staging
A staging makes buyers imagine the living space, while even minimal staging could be great for placing some pillows or flowers.
Open Curtains and Turn on Lights
Natural light makes spaces feel open and warm. Turn on all interior lights to avoid dark corners.
Create a Shot List
You get the shots you need: wide-angle shots of the respective rooms; close-ups of the distinctive features; anything outdoors, if that is relevant.
Lighting Techniques
Use Natural Light When Possible
Shoot during the day with natural light flowing through windows. It creates a welcoming feel.
Avoid Harsh Shadows
If sunlight is too strong, wait until it softens. Use flash to fill in shadows if needed.
Flambient Lighting
Blend flash and ambient light in editing to get evenly lit, natural-looking photos.
Shooting Techniques
Keep Vertical Lines Straight
Use a tripod and level your camera. Crooked lines are a big distraction.
Shoot from Chest Height
Shooting from about 4–5 feet off the ground gives the most natural perspective.
Frame the Room
Shoot from corners to capture the entire space. Show how rooms connect.
Use HDR
The typical workflow consists of taking multiple exposures and blending them later to preserve the details in bright windows and dark corners.
Editing and Post-Processing
Software
Use Lightroom, Photoshop, or dedicated HDR software to edit your photos.
Basic Edits
A little brightness here and contrast there, shadows and highlights added and reduced, and color balance fine-tuning should occur, as necessary. Any lens distortion should be corrected, then the cropping is the last stage.
Advanced Edits
Replace skies, remove unwanted objects, or use virtual staging tools if necessary.
Drone and Aerial Photography
Benefits
Showcase large properties, neighborhoods, and unique views from above.
Drone Requirements
Use a handy drone camera such as a DJI Mini 3 Pro. Be sure to follow local regulations concerning drone flying and obtain a license if required.
Aerial Tips
Shoot during calm weather with soft light. Use editing to enhance color and sharpness.
3D Tours and Virtual Walkthroughs
Matterport and Similar Tools
Use 3D scanners or apps to create virtual tours. These add depth and interactivity.
Floorplans
Include accurate floorplans to help viewers understand layout.
Working with Clients
Set Expectations
Discuss deliverables, turnaround time, and pricing before the shoot.
Be On Time and Professional
Treat every shoot like a business transaction. Show up early and be prepared.
Deliver On Time
Quick delivery keeps clients happy. Offer 24–48 hour turnaround if possible.
Offer Packages
Create tiered pricing: basic photos, photo + video, premium with drone/virtual tours.
Building a Real Estate Photography Business
Create a Portfolio Website
Showcase your best work. Make it easy for clients to contact you.
Network with Realtors
Attend local real estate meetups or join online groups. Reach out to agents directly.
Get Reviews and Referrals
Ask happy clients for testimonials. Encourage word-of-mouth marketing.
Market Your Services
Use Instagram, Facebook, LinkedIn, and Google My Business. Post before/after shots.
Common Mistakes to Avoid
- Crooked verticals
- Overexposed windows
- Too much clutter in shots
- Not editing consistently
- Shooting without proper lighting
Final Thoughts
Real estate photography opens doors for one to work something part-time or simply run a full-time business. From the equipment choice, the techniques of photography, to the strategy for marketing, everything must be aimed at one goal: to ferret houses out faster and for more money through the pictures that we produce. This guide will teach you the technique and grow the selling real estate-related photography business.


0 Comments